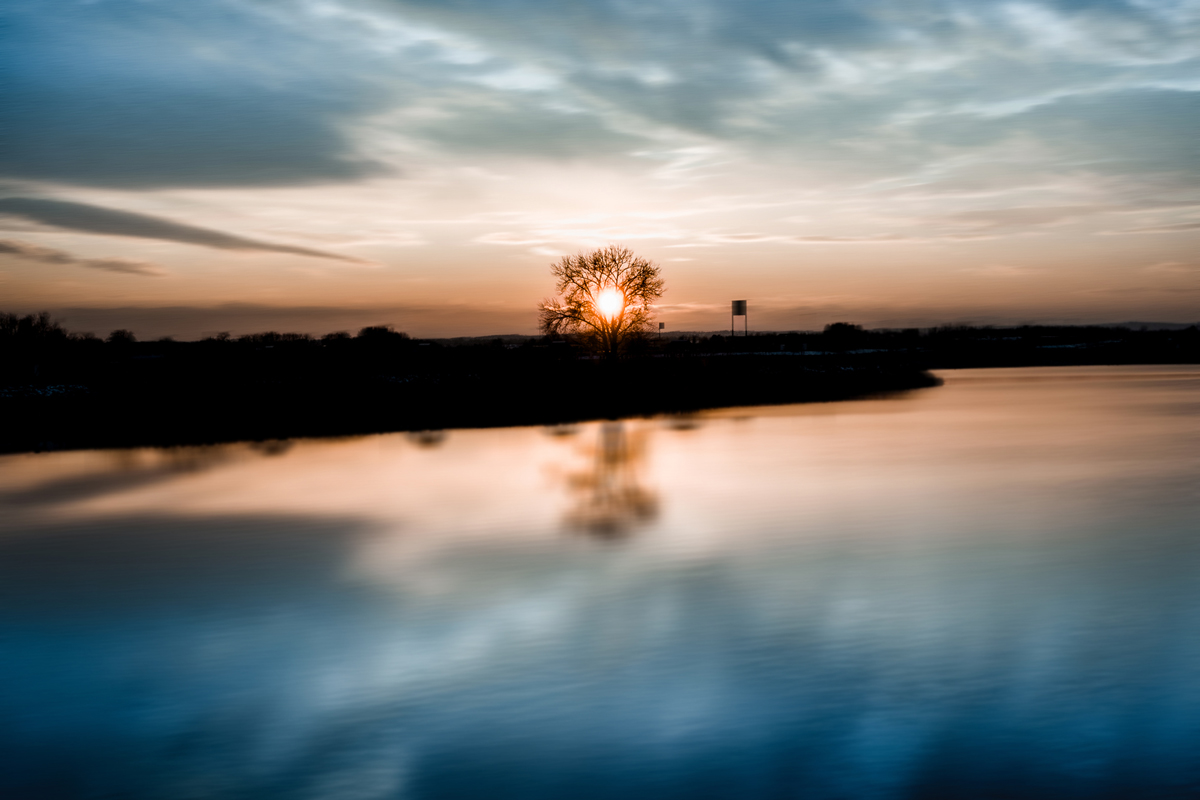
A drone never truly stands still. Even in a hover, it is making small corrections — leaning into the wind, shifting position, turning almost imperceptibly around its vertical axis. A long exposure asks it to behave like a tripod suspended in moving air. That contradiction is what makes the technique difficult, and what makes a successful frame feel different from an ordinary aerial photograph.
I learned this over water near Murska Sobota with a DJI Mini 2. The scene was simple: a low sun, a dark line of land, a solitary tree and a reflection stretching across the surface. The first exposure was too ambitious for the wind. The drone moved, the entire frame softened, and the water was not the only part that appeared fluid.
The solution was not to keep extending the exposure. I shortened it, made a cleaner file and later used controlled motion blur in Photoshop to bring the image closer to what I had imagined. That distinction matters. The published photograph is a hybrid of capture and editing — not proof that a 249-gram drone can hover like a concrete pier for several seconds.
For anyone arriving here for settings rather than the story, this is the practical starting point:
| Starting setting | My recommendation |
|---|---|
| File format | RAW/DNG, or RAW + JPEG |
| Exposure mode | Manual |
| ISO | Start at the camera’s base ISO, usually ISO 100 |
| First shutter speed | Start around 1/2 second in calm air |
| Aperture | Use the sharp middle range if adjustable; the DJI Mini 2 is fixed at f/2.8 |
| ND filter | Add only enough density to reach the target shutter speed without clipping highlights |
| Capture method | Make 8–12 separate frames and inspect them at 100% |
| Flight condition | Calm, steady air with no sudden gusts |
| Best subjects | Water, traffic, clouds, waves and other motion against a static structure |
What long exposure drone photography actually means
A long exposure records change during the time the shutter is open. Water spreads into a smoother surface, vehicle lights become lines, waves lose their hard edges and moving clouds stretch across the sky. On a tripod, the camera remains fixed while the subject moves. From a drone, both the subject and camera can move.
If the relationship between exposure time and motion is still unfamiliar, my guide to shutter speed in photography explains the foundation before the added complication of a hovering aircraft.
That creates two very different kinds of blur:
- Subject motion is usually the effect I want. It can turn a reflection, road or shoreline into a visible passage of time.
- Camera motion affects the entire frame. Trees, roofs, shorelines and the horizon lose definition together. Unless it is deliberate, this is normally a failed exposure.
The useful question is therefore not simply, “How long can my drone expose?” It is, “How long can this drone expose in these conditions while keeping the static parts of this composition acceptably sharp?”
For a small aircraft, 1/2 second can already be a genuine long exposure. Two seconds can be excellent in calm air. Four seconds may be technically available and still be unusable in practice. The maximum number in a specification is not a promise of sharpness.
Single-frame, stacked and simulated long exposures
Three different methods are often grouped under the same label:
| Method | What happens | Main advantage | Main limitation |
|---|---|---|---|
| Single long exposure | One file records movement while the shutter is open | Natural motion and a simple workflow | Any drone drift softens the whole image |
| Multi-frame stack | Several shorter exposures are aligned and averaged or blended | More chances of sharp structure and control over the final effect | Alignment, ghosting and edge cropping require care |
| Simulated blur | Motion blur is added selectively in editing | Works when flight conditions prevent a clean long exposure | It is a creative composite, not an untouched capture |
None of these methods is automatically more artistic. They simply describe different processes. In documentary work, competitions or technical demonstrations, I would disclose the process. In a personal landscape photograph, a hybrid edit can be entirely legitimate as long as I do not misrepresent how it was made.
Why long exposures are harder from a drone
Modern drones can hover with remarkable precision, but the image sensor still notices movements that are too small to see on a phone screen.
A gimbal is not an aerial tripod
The gimbal stabilises the direction in which the camera points. It can compensate for much of the aircraft’s pitch, roll and vibration. It cannot completely erase translation through space, a small yaw around the vertical axis or a sudden correction caused by a gust.
This difference explains many confusing failures. The live view may look calm because the gimbal is holding the horizon level. The downloaded file can still show double edges or a soft shoreline because the camera changed position during the exposure.
Wind is rarely constant
An app may report an average wind speed that appears manageable, while the aircraft is encountering stronger air at its actual altitude. Buildings, trees, slopes and shorelines create turbulence. Wind can also change direction above an apparently sheltered takeoff point.
Long exposure work is particularly sensitive to gusts because the drone may be stable for most of a one-second exposure and move during the final fraction. The resulting file looks almost sharp — often the most frustrating kind of failure.
Small sensors and fixed apertures narrow the options
Many compact drones use a fixed aperture. The DJI Mini 2, for example, uses f/2.8. Once I have lowered the ISO to its base value, the only way to lengthen a daylight exposure without overexposing the frame is to reduce the incoming light with an ND filter or wait for lower light.
Drones with adjustable apertures offer another control, but stopping down indefinitely is not a complete solution. Very small apertures can introduce diffraction, while changing the aperture also changes lens performance and, on some cameras, the character of sunstars. My separate guide explains aperture, f-stops and depth of field in detail. An ND filter remains useful when the desired shutter speed is far slower than the ambient light allows.
Battery time changes the pace
With a tripod, I can leave the camera in place while I reconsider a composition. A hovering drone is consuming battery throughout that decision. Cold air, wind and repeated position corrections can reduce the comfortable working time further.
I plan the frame on the ground, launch with a clear sequence and land with a generous reserve. A long-exposure experiment is not a reason to remain airborne until the battery warning becomes the most important decision.
What my DJI Mini 2 experiment taught me
The original version of this article reduced the experience to a few lines: the wind blurred my first attempt, I used a faster shutter speed, and Photoshop helped finish the image. Those facts are still the useful core of the story, but they deserve a more precise reading.
First, “long exposure” is relative to the platform. A shutter speed that feels ordinary on a tripod may be demanding from a light drone. When the whole frame is soft, extending the exposure is not perseverance; it is repeating the wrong test.
Second, the exact settings matter less than the failure pattern. The published JPEG no longer contains usable exposure metadata, so I cannot honestly tell a reader that this scene was photographed at a particular fraction of a second or through a particular ND filter. Any exact recipe would be invented after the fact.
Third, the edit should not conceal the method. Adobe’s Motion Blur filter creates directional blur by applying an angle and distance in post-production. I used that kind of intervention to strengthen the movement after capturing a cleaner base. The result belongs to creative landscape photography, but it is different from a straight single exposure.
Looking at the published frame now, the evidence is visible in the picture itself. The bare tree and the dark line of land hold their shape, while the cloud and the water carry long directional streaks that run in a consistent direction across the whole surface. Real moving water rarely organises itself that uniformly. That is the signature of blur applied in editing rather than gathered by the sensor.
The more useful lesson is repeatable: shorten the exposure until the fixed parts of the scene hold together, collect several files, and decide later whether a single frame, a stack or a disclosed creative edit best expresses the scene.
The equipment that actually matters
Long exposure drone photography does not require a large collection of accessories. It requires a camera that allows enough control and an aircraft that is safe to fly in the chosen conditions.
A drone with manual photo control
At minimum, I want control over shutter speed and ISO. RAW/DNG support is strongly preferable because long exposures often need highlight recovery, shadow adjustment, noise reduction and local colour work.
The official DJI Mini 2 support page lists manual photo control, RAW support and an electronic-shutter range from 4 seconds to 1/8000 second. Its still photograph modes also include single shot, interval capture and three-frame AEB.
Those specifications make the Mini 2 capable of the technique. They do not mean every four-second frame will be sharp. A heavier aircraft, newer positioning system or larger camera may improve the success rate, but no consumer drone is independent of wind.
Compatible ND filters
An ND filter is neutral-density glass placed in front of the lens to reduce light without intentionally changing colour. It gives the shutter more time before the image becomes overexposed. DJI’s own explanation of drone ND filters identifies long exposure as one of their photographic uses.
The important word is compatible. A filter must fit securely, remain within the gimbal’s supported load and clear its movement during startup. I do not improvise mounts in the air or assume that a filter designed for a similar-looking camera is safe.
Spare battery, clean lens and clear storage
A second battery creates more value than an oversized filter collection. Long-exposure work involves hovering, reviewing and repeating, so flight time disappears quickly.
Before launch, I also clean the lens and filter, check that the memory card has space and confirm that RAW capture is enabled. Dust, fingerprints and flare become more visible around bright reflections and a low sun. These are cheap problems to prevent and tedious problems to repair.
My step-by-step camera setup
The controls vary between aircraft, but the exposure logic remains the same.
1. Choose the movement before choosing the setting
I first decide what should move. Water may need only a gentle softening. Traffic needs enough time for lights to travel through the composition. Fast clouds can show direction in a shorter exposure than slow clouds. A field moving in the wind may blur attractively, but the same wind may make the aircraft unstable.
This prevents a common mistake: selecting a two-second exposure because it sounds “long,” then searching for a subject that happens to fit it.
2. Switch to manual exposure
Automatic exposure is designed to produce a usable brightness, not a specific motion effect. In manual mode, I set the ISO first, choose the target shutter speed and then add filtration or wait for the light to change.
If the drone has an adjustable aperture, I choose it for the required depth of field and lens performance before using ND strength as the final exposure control. On a fixed-aperture drone such as the Mini 2, this decision is already made by the camera.
3. Use RAW and the lowest practical ISO
I start at base ISO — often ISO 100. Raising ISO makes the sensor more sensitive in the camera’s processing pipeline and forces a faster shutter for the same brightness, which is the opposite of what I usually want. It can also make shadow noise and colour correction more difficult.
RAW does not rescue camera movement, but it gives more room to recover highlights, balance the sky and water, and process several files consistently.
4. Fix white balance
Auto white balance can change slightly between consecutive frames. That is inconvenient when I want to compare exposures or stack them. I set a fixed daylight, cloudy or manual Kelvin value that looks reasonable, knowing that RAW still allows careful adjustment later.
5. Turn on the histogram and overexposure warning
The small phone preview is useful for composition but poor for judging clipped highlights. I watch the histogram and any zebra warning, especially when the sun or its reflection is inside the frame.
I would rather preserve important highlights and lift a controlled shadow later than turn the brightest part of the image into a featureless white patch. The histogram is not a rule that must fit perfectly between two walls; it is evidence about where the tonal information is going.
6. Begin faster, then work slower
I make a reference frame at a shutter speed likely to be sharp. Then I lengthen the exposure in measured steps: perhaps 1/8, 1/4, 1/2, 1 and 2 seconds, depending on the subject, light and drone.
This sequence gives me a clean safety frame and shows where aircraft movement begins to overwhelm subject movement. Starting immediately at the camera’s maximum exposure wastes battery and makes diagnosis harder.
7. Let the aircraft settle
After repositioning, I release the controls and wait several seconds. I watch the horizon, position indicator and surrounding airspace. If the drone is making visible corrections or being pushed sideways, I do not treat the shutter button as a cure.
8. Make a series, not one heroic frame
For each setting, I make multiple separate exposures. Eight or twelve files may contain only one that is genuinely sharp in the static areas. That is normal. A single success is more useful than a sequence that looks acceptable only at phone size.
Shutter-speed guide for common aerial subjects
There is no universally correct drone long-exposure setting. Subject speed, distance, focal length, aircraft stability, wind and the final display size all change the result. The ranges below are starting points, not promises.
| Subject or effect | Useful starting range | What I inspect |
|---|---|---|
| Slightly softened water | 1/4–1/2 second | Sharp banks, rocks, bridges and trees |
| Smoother water and reflections | 1/2–2 seconds | Double edges along the shoreline |
| Waves around a coast | 1/2–2 seconds | Texture in the water without losing the shape of the coast |
| Moving cars in twilight | 1–4 seconds | Continuous light trails and sharp buildings |
| Fast clouds | 1–4 seconds | Directional movement without global softness |
| Illuminated boats | 1–4 seconds | Whether boat movement supports or confuses the composition |
| Dark blue-hour landscape | 1–4 seconds | Highlight clipping, noise and whole-frame drift |
On the Mini 2, four seconds is the specified maximum for a still exposure. On other drones the limit can be shorter, longer or partly computational. I check the manual for the exact camera rather than transferring settings from one model to another.
Why 1/2 second is my practical starting point
Half a second is long enough to make moving water visibly different from an ordinary fast-shutter frame, yet short enough to give a small drone a reasonable chance in calm air. It also produces a useful baseline: if every 1/2-second file is soft, two or four seconds will not improve the aircraft’s stability.
If 1/2 second is sharp but the movement is too weak, I can add density and test one second. If one second fails, I still have the shorter files for stacking.
When a faster shutter is the better photograph
Long exposure is an effect, not a quality rating. The best frame may be the faster one. Reeds, boats, people or tree branches can become distracting when blurred. Water can lose the structure that explains the place. A sunset reflection can turn into an undifferentiated bright band.
I compare the long exposure with the reference frame before deciding. The slower shutter must contribute something beyond announcing that I used a slower shutter.
How to choose an ND filter for a drone
ND filters are labelled by the amount of light they block. Each one-stop reduction doubles the exposure time if ISO and aperture remain unchanged.
| Filter | Light reduction | Example: if the unfiltered exposure is 1/125 s |
|---|---|---|
| ND4 | 2 stops | about 1/30 s |
| ND8 | 3 stops | about 1/15 s |
| ND16 | 4 stops | about 1/8 s |
| ND32 | 5 stops | about 1/4 s |
| ND64 | 6 stops | about 1/2 s |
| ND128 | 7 stops | about 1 second |
| ND256 | 8 stops | about 2 seconds |
These values are rounded to familiar shutter-speed steps. The calculation is simple: the new exposure time equals the original exposure time multiplied by 2 raised to the number of stops.
If the correct unfiltered exposure is 1/250 second and I want approximately one second, I need roughly eight stops of reduction. If the light is already low enough for 1/8 second, only three additional stops are needed to approach one second.
I meter before choosing the filter
I do not fit the darkest filter by default. I first check the unfiltered exposure at base ISO and the chosen aperture. Then I calculate how many stops separate that exposure from the shutter speed I want.
Excessive density creates its own problems: a darker live view, more difficult composition, possible colour cast and a longer shutter than the aircraft can support. The useful filter is the lightest one that reaches the creative goal.
ND and polarizing filters are not interchangeable
A neutral-density filter primarily controls exposure. A circular polarizer manages certain reflections and can deepen parts of a blue sky, but its effect depends on viewing angle. Combined ND/PL filters can do both, yet the polarizer must be oriented before takeoff and can create uneven skies across a wide aerial frame.
For a first attempt at long exposure drone photography, a plain ND filter is easier to diagnose. I change one variable at a time.
Test filters before leaving the ground
I install the filter with the drone switched off, confirm that it is secure and then let the aircraft complete its normal startup and gimbal check. I look for vibration, obstructed movement or an error message.
A photograph is not worth placing an incompatible accessory on a flying aircraft. The drone manufacturer’s guidance takes priority over a generic exposure tutorial.
How I plan the flight before takeoff
The camera work begins before the propellers start. A clear ground plan improves both safety and the number of useful frames I can make from one battery.
Check airspace and geographical zones
I check the official source for the country where I am flying, not only the map inside a manufacturer’s app. In Slovenia, the Civil Aviation Agency publishes UAS geographical restrictions. Airports, populated areas, protected locations and temporary restrictions can change what is permitted.
Across the EU open category, EASA’s basic framework generally requires visual line of sight and a maximum height of 120 metres from the closest point of the earth’s surface. Subcategory, aircraft class, people on the ground, national geographical zones and the exact operation still matter. Outside Europe, I check the relevant national aviation authority; in the United States, the FAA also emphasises visual line of sight and applicable airspace restrictions.
This is practical guidance, not a substitute for current regulations. I verify the rules again before each flight because an article remains online longer than many operational notices.
Registration can apply below 250 grams
The DJI Mini 2 is commonly described through its sub-250-gram weight, but weight alone does not answer every registration question. The Slovenian CAA states that operator registration can also apply when an aircraft carries a sensor capable of capturing personal data, unless a specific exception applies.
That matters for camera drones. “Under 250 grams” should never be treated as a universal exemption from registration, privacy rules, geographical zones or safe-operation requirements.
Read the wind at the aircraft’s altitude
I compare more than one forecast, inspect gusts rather than only averages and observe trees, flags, water and clouds at the location. A calm takeoff area behind a building may hide stronger or more turbulent air above it.
If the drone must visibly lean or make constant corrections simply to hold position, I abandon the slowest exposures. The correct response to unsuitable wind is not a darker filter.
Choose a safe composition on the ground
I identify the likely direction of the camera, the sun’s position, a clear takeoff and landing point, nearby obstacles and an emergency landing option. I also consider whether the drone will remain easy to see against the sky as the light falls.
Long-exposure work concentrates attention on a screen. I deliberately interrupt that concentration to scan the aircraft, airspace, battery and people around the operation.
Keep people and privacy outside the experiment
The technique works best with landscapes, water, roads viewed from an appropriate distance and scenes where moving elements are already part of the environment. I do not use a long exposure as an excuse to hover over uninvolved people, homes or private activity.
The camera may transform motion, but it does not transform the photographer’s responsibilities.
Composing an aerial long exposure
The blur needs something sharp against which it can be read. A frame containing only smooth water or featureless cloud may look unfocused rather than intentionally long-exposed.
Anchor the frame with a static subject
In my Murska Sobota image, the tree and horizon provide the anchor. The reflected light and water can become soft because the dark land tells the eye where stability should exist.
Bridges, piers, coastlines, rock formations, road geometry and buildings can play the same role. I place at least one strong static edge where I can later judge both composition and sharpness.
Use motion with a direction
Vehicle trails work because roads guide them through the image. Waves move toward or along a coast. Clouds can pull the eye toward a horizon. Random blur across the frame is less persuasive.
Before changing the shutter speed, I ask where the movement will lead. A long exposure records time, but composition decides whether that time has a direction.
Protect the highlights
A low sun, streetlight or illuminated building can clip long before the rest of the scene appears bright enough. I use the histogram and highlight warning, then decide whether to underexpose slightly, bracket, recompose or wait for more balanced light.
An ND filter reduces the entire exposure; it does not compress the contrast between the sun and foreground. Sometimes the solution is timing rather than stronger filtration.
Avoid relying on digital zoom
Digital zoom enlarges part of the sensor image and makes movement defects more visible without adding captured detail. For a still photograph, I prefer the full-resolution camera view and crop carefully later if necessary.
How to keep the drone as stable as possible
No setting can turn poor flying conditions into a stable platform, but a disciplined sequence improves the odds.
Use calm air and a conservative altitude
Wind often becomes stronger with altitude. I fly only as high as the composition requires, within all applicable limits. Lower is not automatically legal or safe, but unnecessary height can expose the aircraft to more wind and make visual orientation harder.
Stop moving before the exposure
I finish the positioning movement, release the sticks and allow the aircraft and gimbal to settle. Shooting immediately after yawing or flying sideways increases the chance that a correction continues into the exposure.
Avoid touching controls during capture
Even a small input can ruin a slow frame. I keep my hands relaxed, maintain awareness of the aircraft and avoid changing camera angle until the exposure is complete.
Make many independent frames
One long exposure is a gamble. A short series gives the stabilisation and wind several chances to align in my favour. I do not assume that consecutive frames are identical: a gust can ruin one and spare the next.
Review beyond the phone preview
The live view can hide fine double edges. When practical, I zoom into the recorded file and inspect a static subject near the centre and another near the edge. Back at the computer, I compare at 100% before deleting anything.
Editing a true single-frame drone long exposure
Editing begins with selecting the sharpest file, not with trying to repair the softest one.
1. Check global sharpness first
I inspect the horizon, buildings, rocks and tree branches. If every static edge shows the same directional smear, the aircraft moved. Sharpening may increase contrast around that blur, but it cannot reconstruct detail that was never recorded cleanly.
2. Correct the lens profile and horizon
I apply the correct lens profile if the editor supports it, then level the horizon with a small crop. Aerial views make tiny rotations obvious, particularly where water meets land.
3. Set white balance and tonal range
I correct colour before pushing contrast. Then I protect the brightest reflection or lights, open shadows carefully and watch for noise or banding. Long exposures can accumulate hot pixels and colour noise, especially when underexposed files are brightened heavily.
4. Use local contrast selectively
Global clarity can destroy the smooth quality that motivated the long exposure. I add texture or local contrast mainly to static structures, leaving water and clouds softer.
5. Apply sharpening to the stable elements
I mask sharpening away from smooth water and sky. There is little value in sharpening noise, gradients or intentional motion.
Stacking shorter drone exposures
When the air will not support one clean two-second exposure, stacking several shorter frames can produce a similar accumulated-motion effect with a better chance of preserving fixed details.
Capture for the stack
I keep exposure, white balance, focus, framing and filtration constant. I make a sequence of individual RAW files without moving the aircraft deliberately. The total span of the sequence determines how far cars, clouds or water move.
For example, eight half-second photographs contain four seconds of shutter-open time, although pauses between frames mean the temporal record is not identical to one continuous four-second exposure.
Align before blending
Even a stable sequence will shift slightly. I align the frames using static features, allow the software to crop the moving edges and inspect for warped structures. Water and clouds tolerate imperfect correspondence; buildings, bridges and horizons do not.
Average for smoother water and lower noise
An average or mean blend can smooth random variation across the files and reduce noise. The exact command depends on the editor, but the principle is to align the stack and combine pixel values rather than simply lowering opacity by eye.
Use a lightening blend for traffic trails
For light trails, a lighten or maximum-style blend can preserve the brightest pixels from each frame. This can build continuous lines from several shorter exposures. Gaps between captures, changing traffic and misalignment may still create broken trails or duplicates.
Mask moving subjects when necessary
Boats, people and vehicles can appear several times. I decide whether those repetitions support the image, then mask or retouch carefully. Stacking is not an automatic button; it trades flight instability for more editing decisions.
Simulating motion blur honestly
My original photograph belongs partly in this category. When the wind prevented the clean slow exposure I wanted, I used a faster capture and added motion blur in Photoshop.
Adobe’s Motion Blur filter lets the editor select a direction and distance. Used across an entire frame, it would blur the tree and horizon along with the water. The convincing approach is selective:
- Keep a clean base layer.
- Duplicate it for the effect.
- Apply blur in the direction suggested by the water, clouds or traffic.
- Mask the effect away from static land, buildings and other anchors.
- Reduce opacity until the result supports the scene rather than announcing the filter.
Complex edges require care. Reflections touch shorelines, waves wrap around rocks and tree branches overlap sky. A coarse mask creates halos that are more distracting than the original technical limitation.
I regard this as creative post-production, not a rescue for every failed file. If the base image is globally soft, adding more blur selectively does not restore the missing sharpness. The method works when the capture is structurally clean and the desired motion is plausible.
Common long-exposure drone problems
| Problem | Likely cause | What I change |
|---|---|---|
| The entire image is soft | Drone drift, yaw or vibration | Shorten the exposure, descend if appropriate, wait for calmer air and make a new series |
| Only water, cars or clouds are soft | Subject movement | This may be the intended result |
| Highlights are pure white | Exposure too bright for the scene | Use stronger ND, shorten the exposure, recompose or wait for lower light |
| The image is dark and noisy | Underexposure followed by heavy brightening | Use a lighter ND, expose more carefully and avoid unnecessary ISO changes |
| Every file has a different colour | Auto white balance | Use a fixed white balance for the sequence |
| The horizon shows double edges | Aircraft movement or failed stack alignment | Select a cleaner frame, shorten exposure or realign the stack |
| Stacked cars or boats appear repeatedly | Moving subjects across multiple frames | Change blend mode, mask individual frames or accept the repetition intentionally |
| The sky has an uneven dark band | Polarizer behaviour across a wide field | Reorient or remove the polarizing filter |
| The gimbal reports an error | Filter fit, weight or obstruction | Land, power off and use only a compatible filter |
| The live view is too dark to compose | ND filter is stronger than needed | Compose first where safe, or use a lighter calculated filter |
Why software cannot fix every blurred drone photograph
Deblur and sharpening tools can improve some small, consistent movement. They cannot reliably recreate fine branches, distant roofs and texture that were smeared into several positions. Aggressive correction often creates halos and brittle edges.
The most effective sharpening tool remains another exposure made under better conditions.
When and where the technique works best
Long exposure drone photography is most persuasive when aerial height reveals a pattern that cannot be seen from the ground.
Water and shorelines
Rivers, lakes and coasts provide moving surfaces beside stable geometry. Reflections can stretch, waves can simplify and a shoreline gives an immediate sharpness reference. I avoid making the water so smooth that the character of the place disappears.
Roads and traffic
Blue hour provides enough ambient light to show the landscape while headlights and taillights begin to register as trails. Curving roads, junctions and bridges work better than isolated vehicles because the route itself becomes part of the composition.
I remain especially cautious around roads: national rules, geographical zones, uninvolved people and moving vehicles can limit where and how a flight is allowed.
Clouds and changing weather
Cloud movement can add direction above a static landscape, but the weather creating dramatic clouds may also make the flight unsuitable. I do not confuse a promising sky with permission to launch.
Twilight cityscapes
Buildings provide strong static anchors while traffic and illuminated water supply movement. Cities also concentrate controlled airspace, people, privacy concerns and national restrictions. The technical opportunity may be excellent while the lawful flight opportunity is poor.
Boats and harbours
Moving lights and reflections can be beautiful, but boats rarely remain fixed. A long exposure may turn them into blurred shapes or repeated objects in a stack. I compose with that movement rather than expecting every vessel to stay sharp.
Long exposure drone photography at night
Night removes the need for strong ND filters, but it does not remove the need for planning. The aircraft becomes harder to see, obstacles disappear into darkness and battery, weather and geographical-zone decisions become less forgiving.
I confirm that night flight is permitted for the exact operation and location, that the aircraft has the lighting required by current rules, and that I can maintain visual line of sight. I also choose and inspect the takeoff area in daylight when possible.
Technically, I keep ISO as low as the scene permits, protect bright lamps and make several exposure lengths. A four-second frame at ISO 100 may be cleaner than a short high-ISO exposure if the drone holds still, but sharp structure remains the first test. The camera’s maximum exposure time and the drone’s stability determine the practical ceiling.
A compact field checklist
Before leaving
- Confirm the drone, controller, batteries, propellers and firmware are ready.
- Pack only compatible ND filters and clean them.
- Check weather, gusts, airspace, UAS geographical zones and local restrictions.
- Confirm registration, competency and any required authorisation for the operation.
- Plan the sun or artificial-light direction and likely subject movement.
Before takeoff
- Inspect the aircraft and gimbal.
- Confirm RAW or RAW + JPEG.
- Set manual exposure, base ISO and fixed white balance.
- Enable the histogram and highlight warning.
- Identify people, obstacles, an emergency landing area and a safe return path.
In the air
- Compose without unnecessary altitude.
- Let the aircraft settle after every movement.
- Make a sharp reference frame.
- Test progressively slower shutter speeds.
- Capture multiple files at each useful setting.
- Keep scanning the aircraft, battery, airspace and surroundings.
After landing
- Inspect static edges at 100%.
- Separate sharp files from globally blurred files.
- Decide between a single exposure, aligned stack or disclosed creative blur.
- Process the static and moving parts differently.
- Keep the original RAW files and export a separate final version.
Frequently asked questions
Can a drone take true long-exposure photographs?
Yes. A drone with manual shutter control can make a genuine single-frame long exposure while hovering. The practical limit depends on the aircraft, wind, positioning accuracy, exposure time and the sharpness required for the final image.
What is the best shutter speed for long exposure drone photography?
I start around 1/2 second in calm air, inspect the static parts of the image and then test one or two seconds. The best setting is the slowest exposure that creates useful subject movement while keeping the intended static elements sharp.
Do I need an ND filter?
In daylight, usually yes if the camera is already at base ISO and cannot close the aperture enough to reach the desired shutter speed. Around blue hour or at night, ambient light may already be low enough. Calculate the required stops rather than fitting the darkest available filter.
Which ND filter should I use for a one-second drone exposure?
Meter the unfiltered scene first. If the correct exposure is 1/125 second, roughly seven stops — about ND128 — brings it near one second. If the unfiltered exposure is 1/15 second, about four stops — ND16 — does the same. Light changes, so no single filter always produces one second.
Should I use ISO 100?
Base ISO is the best starting point because it generally preserves highlight range and minimises noise while allowing a slower shutter. Raise ISO only when the scene or camera requires it; increasing ISO usually works against the goal of extending exposure.
Can the DJI Mini 2 take long exposures?
Yes. DJI specifies manual photo control, RAW support and shutter speeds as slow as four seconds for the Mini 2. Its aperture is fixed at f/2.8, so daylight long exposures often require a compatible ND filter. Four seconds is a technical limit, not a guarantee of a sharp frame in wind.
Why are my drone long exposures blurry?
If static features and moving subjects are all blurred in the same direction, the drone moved. Shorten the exposure, wait for calmer air, let the aircraft settle and make several files. If only water, clouds or vehicles are blurred while structures remain sharp, the technique is working.
Is stacking better than one long exposure?
It is often more reliable. Several shorter, sharper frames can be aligned and averaged for smooth water or combined with a lightening blend for trails. A stack is not identical to one continuous exposure and may create ghosting, repeated subjects or edge-cropping problems.
Can I add the long-exposure effect in Photoshop?
Yes. Directional motion blur can be applied selectively to water, clouds or traffic while masking static subjects. That creates a simulated or hybrid result. It should not be presented as an untouched single-frame exposure when the capture method matters.
How windy is too windy?
There is no single photography threshold that applies to every drone, direction and location. Manufacturer limits concern safe operation, while a sharp multi-second exposure demands much calmer conditions. If the aircraft is visibly correcting, the horizon shifts or repeated short tests are globally soft, I stop extending the exposure.
Is long-exposure drone photography legal at night?
It depends on the country, airspace, geographical zone, aircraft and operation. In Europe, current EASA and national requirements apply; elsewhere, consult the national aviation authority. Night operation can require specific lighting and still requires visual line of sight and compliance with all location restrictions.
Do I need to register a drone below 250 grams?
Possibly. In Slovenia and under the broader EU framework, a camera capable of capturing personal data can trigger operator-registration requirements even when the drone is below 250 grams, unless an applicable exception applies. Verify current guidance with the national aviation authority.
Final thoughts
The useful tension in long exposure drone photography is not between technology and creativity. It is between the movement I want and the movement I cannot allow.
Water, traffic and clouds may travel through the frame. The horizon should not. Once I began judging those two kinds of movement separately, the process became less mysterious. I stopped chasing the longest number available in the camera menu and started building a sequence: a sharp reference, a cautious slow exposure, several repeats and a clear decision about whether the final photograph would be a single frame, a stack or a hybrid edit.
My DJI Mini 2 photograph near Murska Sobota did not emerge as a perfect untouched long exposure. The wind made that clear. What it gave me was more useful: an image, a limitation and a method I could explain honestly. In aerial photography, that honesty is part of the craft.